Suitable for unsupported and supported applications.
May be laid directly over insulation and insulated sarking board in convection-tight roof designs.
Fixing Instructions
Install TLX Batsafe™ in accordance with the following instructions and with the relevant standards, for example:
BS 5534: 2003 Code of Practice for slating and Tiling, Part 1.
Design: BS 5250 : 2011 Code of Practice for the control of condensation in Buildings.
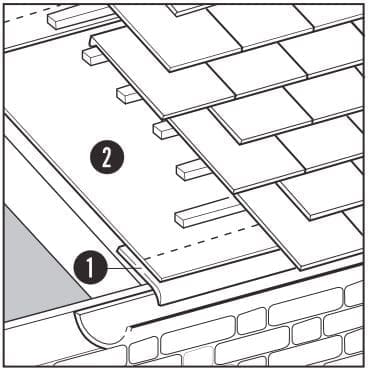
At eaves, use an eaves guard or eaves sheet extending into the gutter then overlap the eaves guard with the first run of TLX Batsafe™, black side uppermost (1) Lay TLX Batsafe™ parallel to eaves, starting at the eaves and working up the slope of the roof (2).
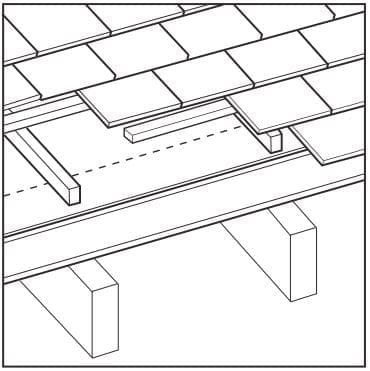
For unsupported applications, allow TLX Batsafe™ to drape slightly (at least 10mm) between the rafters to allow water run-off.
Where TLX Batsafe™ is installed over a fully supported system, fix counter battens, at least 25mm thick, over the underlay and through to the rafters using corrosion-resistant clout nails. Fix tile battens to the counter battens so that there is an uninterrupted air space between the underlay and the roof tiles or slates.
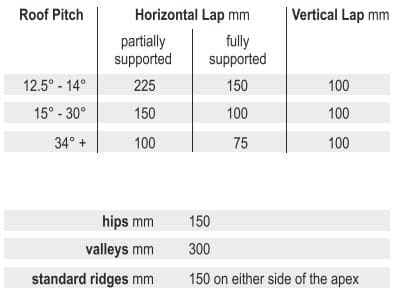
Lap TLX Batsafe™ in according to the tables minimum overlap requirements.
At valleys Batsafe or a traditional bitumen 1F felt that does not contain non-woven material such as spunbond should be used underneath the valley lining itself, with the lapping over it under the first tile/slate.